If you’ve ever opened an app on your iPhone and thought, “I could build something like this,” you’re definitely not alone. In the last ten years, the development of apps for iOS has become one of the most popular and competitive fields in technology. From new companies launching the next big idea to businesses building mobile experiences, the need for skilled developers is growing. If you want to create your own app, become an iOS app developer, or simply understand how apps work, learning this skill can open a lot of doors.
This guide will teach you more than just basic information. Instead of just talking about theory, it shows you how iOS app development services works in real-world situations. You’ll learn how apps are planned, designed, built, tested, and improved over time. We’ll also break down the iOS development process in a way that’s simple to follow, even if you’re just starting.
By the time you finish, you won’t just know what goes into building an app; you’ll understand how everything connects. This clarity helps beginners move forward with confidence and helps experienced developers improve their approach to building better, more reliable apps.
What Is iOS App Development and What Does an iOS App Developer Do?
Basically, iOS app development means making apps that work on Apple devices like iPhones and iPads. These apps are made using Apple’s official tools, frameworks, and programming languages. Once they’re ready, they’re published on the App Store for users to download.
Writing code is only part of the job. Developing modern iOS apps involves planning, designing, making sure they work well, testing them, and updating them regularly. It’s a complete process that takes an idea and turns it into something people use every day.
Difference Between iOS App Development and iOS App Developers

Many beginners mix up these two terms, but the difference is simple:
- iOS app development → the process of creating apps
- iOS app developer → the person who creates them
A simple way to think about it:
The development process is like a recipe. The developer is the chef following the recipe (and improving it).
It’s important to understand this difference, especially if you’re planning to learn iOS development or hire someone for a project.
Core Responsibilities of an iOS App Developer
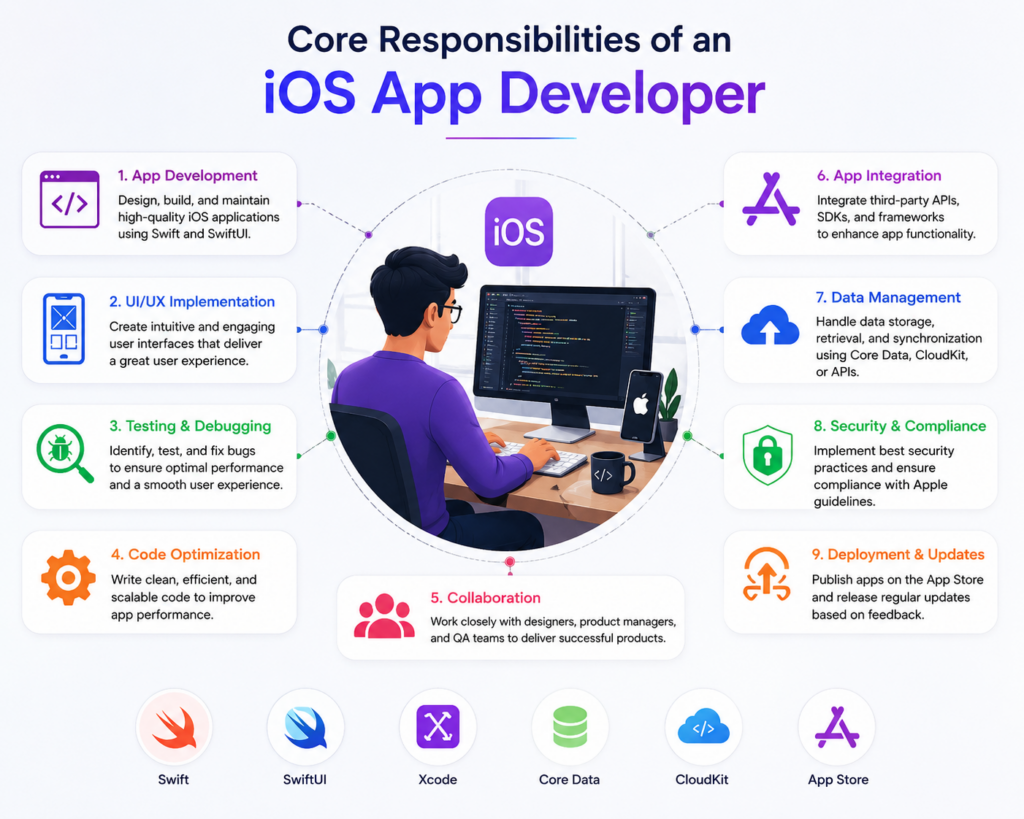
An iPhone app developer who is skilled at their job does a lot more than just write code. In projects in the real business world, their responsibilities usually include:
- Writing clean, efficient code using Swift or Objective-C
- Designing and structuring the app’s architecture
- Connecting the app to backend services using APIs
- Handling data using tools like JSON parsing
- Debugging issues and fixing bugs
- Improving app speed, memory usage, and overall performance
- Working closely with designers, product managers, and testers
In reality, developers spend a lot of time solving problems. For example, figuring out why an app crashes when it’s used a lot or why a screen takes a long time to load. These are the kinds of challenges that define real iOS mobile app development work.
How iOS Apps Work in the Apple Ecosystem?
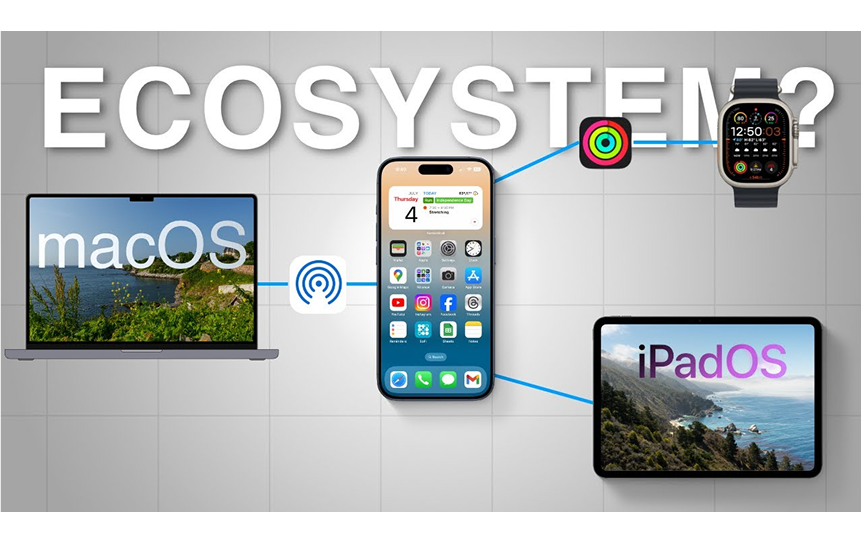
Apple has a very controlled and secure environment, which is important for how apps work. Every app runs inside something called app sandboxing, which keeps it isolated from other apps and protects user data.
Apps communicate with the system using the iOS SDK and built-in frameworks. This makes sure that all Apple devices have the same features, perform well, and are secure.
Here’s a simplified flow of what happens when someone opens your app:
- The system launches the app
- The app lifecycle begins
- The user interface (UI) loads
- The app fetches data (often through APIs)
- User actions trigger logic, updates, and screen changes
Apple controls both the hardware and software of its devices, which makes apps feel smoother and more reliable. This is one of the main reasons why iOS app development is known for delivering high-quality user experiences.
iOS Application Development Fundamentals
Before you start building anything, you need a solid understanding of the core building blocks behind iOS app development. These fundamentals shape how your app behaves, how fast it runs, and how easy it is to scale later.
Many beginners jump straight into coding, but without these basics, things quickly get confusing. Let’s simplify the key concepts so you can build with confidence.
Programming Languages (Swift vs Objective-C)
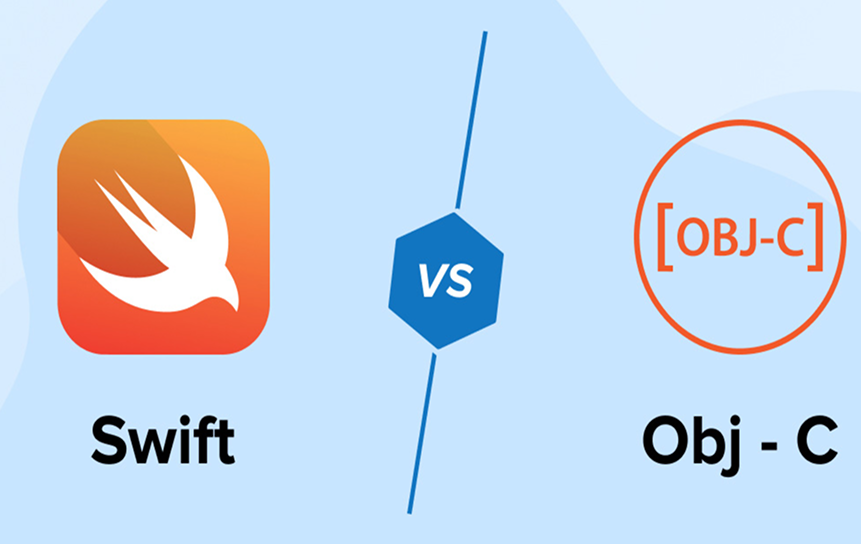
In iOS mobile app development, there are two main programming languages:
- Swift: Modern, fast, and beginner-friendly
- Objective-C: Older, mostly used in legacy apps
If you’re starting today, Swift is the clear choice. It’s designed to make development easier, safer, and more efficient.
Quick Comparison
| Feature | Swift | Objective-C |
| Learning Curve | Easy for beginners | Steeper and more complex |
| Syntax | Clean and readable | Verbose and harder to read |
| Performance | Fast and optimized | Slightly slower in comparison |
| Safety | Strong type safety | More prone to runtime errors |
| Use Case | Modern apps | Legacy systems |
Why Swift Is Preferred
- Less code to write and maintain
- Built-in safety features reduce crashes
- Better support from Apple
- Works seamlessly with modern tools like SwiftUI
If your goal is to become an iOS app developer, focusing on Swift is one of the smartest decisions you can make early on.
Understanding iOS SDK and Frameworks
The iOS SDK (Software Development Kit) provides everything you need to build apps, from UI components to data handling tools. Instead of creating everything from scratch, developers rely on frameworks to speed up development and maintain consistency.
Key iOS Frameworks
| Framework | Purpose | When to Use |
| UIKit | Traditional UI development | Complex or older apps |
| SwiftUI | Modern UI framework | New apps and faster UI building |
| Core Data | Local database management | Storing structured app data |
| Foundation | Core system utilities | Networking, data types, basic logic |
These frameworks act like pre-built building blocks. For example, instead of manually coding how a button behaves, you use UIKit or SwiftUI components that already handle it.
This is why understanding frameworks is a key part of iOS development basics; they save time and reduce errors.
App Lifecycle Explained
Every app goes through a series of states from the moment it launches to when it closes. This is known as the app lifecycle, and understanding it is essential for building stable apps.
App Lifecycle Stages
| Stage | What Happens |
| Launch | App starts and initializes resources |
| Active | User is interacting with the app |
| Background | The app is running but not visible |
| Suspended | App is paused in memory to save resources |
| Terminated | App is fully closed and removed from memory |
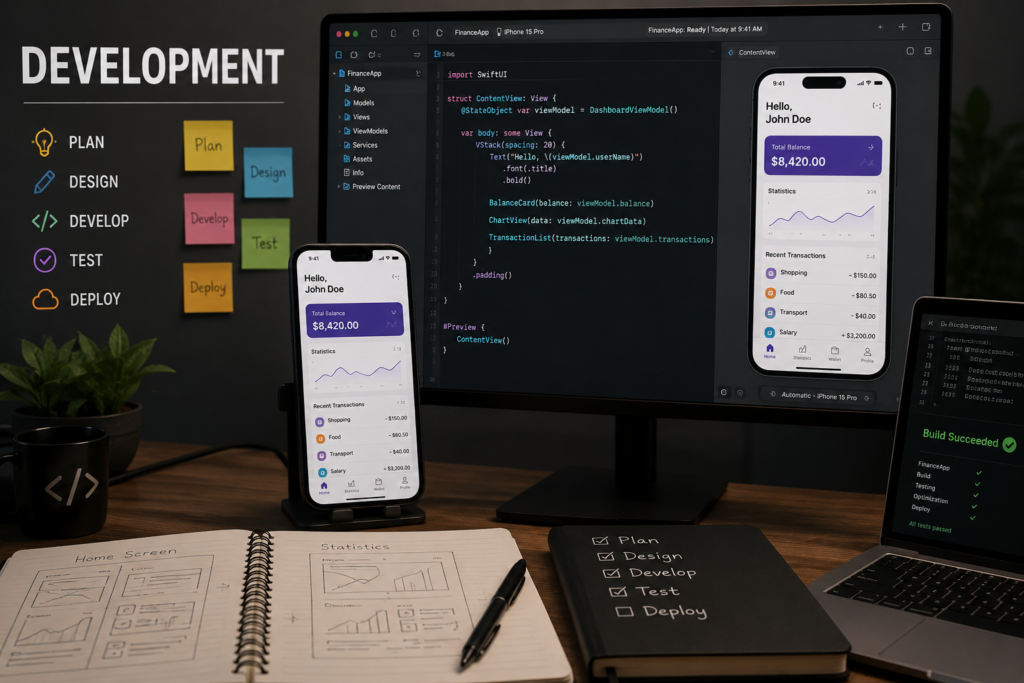
iOS Mobile App Development Process Step by Step
Building an app isn’t just about writing code; it’s a structured journey. If you’ve been wondering how to develop an iOS app step by step, this section breaks it down in a practical, real-world way. Each stage builds on the previous one, and skipping steps usually leads to problems later.
Idea Validation and Planning
This is the stage most people rush, and it’s also where many apps fail before they even start.
A good app begins with a clear purpose. Instead of opening Xcode right away, take time to think through the idea:
- What problem does your app solve?
- Who is it for?
- Are there already similar apps? If yes, what can you do better?
At this point, your goal isn’t perfection, it’s clarity.
Create a simple MVP (Minimum Viable Product). This means listing only the essential features your app needs to work. Avoid trying to build everything at once.
Simple Planning Snapshot
| Step | What to Focus On |
| Problem | Real user pain point |
| Audience | Who will use your app |
| Competitor Research | What already exists |
| MVP Features | Only the must-have functionality |
A well-planned idea will save you weeks (or months) of wasted effort later in the iOS development process.
UI/UX Design Workflow
Design is more than just making things look nice. It directly affects how users interact with your app.
A confusing interface can ruin even the best idea.
The design process usually moves through these stages:
- Wireframes: Rough layout of screens
- Prototypes: Clickable version of the app flow
- Design system: Consistent colors, fonts, and components
- User testing: Feedback from real users
Design Workflow Overview
| Stage | Purpose |
| Wireframing | Plan layout and structure |
| Prototyping | Simulate user interactions |
| Design System | Maintain visual consistency |
| Testing | Identify usability issues early |
Good design doesn’t just improve looks, it reduces confusion, cuts down development time, and keeps users coming back.
Development and Coding
Now comes the core part of iOS application development, actually building the app.
This is where your idea turns into a working product.
Typical development flow:
- Set up your project in Xcode
- Build the interface using SwiftUI or UIKit
- Write the app’s logic (how it behaves)
- Connect to APIs for dynamic data
Development is not a straight line. You’ll constantly go back and adjust things as new issues or ideas come up.
Development Breakdown
| Task | Description |
| Project Setup | Create app structure in Xcode |
| UI Development | Build screens and layouts |
| Business Logic | Handle user actions and data flow |
| API Integration | Connect the app with backend services |
This phase is where problem-solving becomes a daily routine for any iOS app developer.
Testing and Debugging
No app works perfectly on the first try, no matter how experienced the developer is.
Testing is what turns a “working app” into a reliable one.
Developers typically rely on:
- Xcode debugging tools
- Console logs
- Simulators for quick checks
- Real devices for accurate testing
Testing Tools and Purpose
| Tool | Why It’s Used |
| Simulator | Fast testing across devices |
| Real Device | Real-world performance check |
| Debugger | Find and fix code issues |
| Logs | Track app behavior and errors |
Testing ensures your app works smoothly across different screen sizes, iOS versions, and usage scenarios.
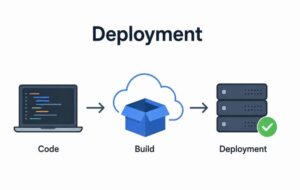
Deployment Process
Once your app is stable and tested, it’s time to launch.
But publishing an app isn’t just a button click, Apple has a strict review process.
Here’s what the final stage looks like:
- Archive your app in Xcode
- Upload it to App Store Connect
- Add details like app description, keywords, and screenshots
- Submit for Apple’s review
Deployment Checklist
| Step | What to Do |
| Build Archive | Prepare final app version |
| Upload | Send app to App Store Connect |
| Metadata | Add description, visuals, keywords |
| Review Submission | Submit for Apple approval |
If your app doesn’t follow Apple’s guidelines, it can get rejected, so attention to detail matters here.
iOS App Development Lifecycle Framework

The key to knowing how to develop iOS apps is understanding the whole process. It’s not just about building an app and publishing it. Every app goes through a complete cycle, often repeatedly.
If you’re trying to understand the steps in developing iOS apps, think of it as a loop, not a straight line. After deployment, the process continues with updates, fixes, and improvements.
Let’s go through each step clearly and realistically.
Stage 1: Planning

Everything starts here. This is where you define what you’re building and why.
At this stage, you should focus on:
- Clear goals (What problem are you solving?)
- Target audience (Who will use your app?)
- Core features (What does the app need to do?)
Planning Overview
| Element | Key Focus |
| Goals | Purpose of the app |
| Audience | Target users |
| Features | MVP (minimum required features) |
Skipping proper planning often leads to wasted time and constant changes later in the iOS development process.
Stage 2: Design

Once the idea is clear, the next step is shaping how it will look and feel.
This includes:
- Designing the user interface (UI)
- Mapping user flows (how users move through the app)
- Ensuring the app is easy to use
Design Focus Areas
| Area | Description |
| UI Design | Visual layout of screens |
| UX Flow | User journey and interactions |
| Consistency | Colors, fonts, and components |
Good design reduces confusion and makes development smoother. It also plays a huge role in user retention.
Stage 3: Development
This is where actual iOS application development happens.
Developers start turning designs into a working app by:
- Writing code in Swift
- Building UI with SwiftUI or UIKit
- Implementing features and logic
- Integrating APIs and data
Development Breakdown
| Task | Purpose |
| UI Implementation | Build screens |
| Logic Handling | Define app behavior |
| API Integration | Connect to backend services |
This stage often overlaps with testing, as developers continuously check their work.
Stage 4: Testing

No matter how well you code, bugs are unavoidable. That’s why testing is a critical part of the lifecycle.
At this stage, developers:
- Identify bugs and crashes
- Fix performance issues
- Test across devices and screen sizes
Testing Goals
| Goal | Why It Matters |
| Stability | Prevent crashes |
| Usability | Ensure smooth user experience |
| Compatibility | Work across devices |
Strong testing is what turns a basic app into a reliable one.
Stage 5: Deployment
Once the app is stable, it’s ready to go live.
This stage includes:
- Preparing the final build in Xcode
- Uploading to App Store Connect
- Adding descriptions, screenshots, and keywords
- Submitting for Apple review
Deployment Steps
| Step | Description |
| Build | Create a release version |
| Upload | Send to App Store |
| Metadata | Add app details |
| Review | Apple approval process |
Apple has strict guidelines, so even small mistakes can delay your launch.
Stage 6: Maintenance

This is the most overlooked part of iOS mobile app development, especially for beginners.
Once your app is live, the work doesn’t stop. In fact, this stage often lasts longer than development itself.
Maintenance includes:
- Fixing bugs reported by users
- Updating the app for new iOS versions
- Improving performance
- Adding new features over time
Maintenance Responsibilities
| Task | Purpose |
| Bug Fixes | Improve stability |
| Updates | Stay compatible with iOS changes |
| Feature Updates | Keep users engaged |
| Optimization | Improve speed and performance |
Apps that aren’t maintained quickly become outdated or unusable.
Swift Programming for iOS App Development
Swift is the backbone of modern iOS development basics.
Syntax and data structures

Swift is clean and readable:
- Variables and constants
- Arrays and dictionaries
- Optionals (a key concept)
Example:
let name = “iOS Developer”
Functions and protocols

Functions define behavior, while protocols define structure.
Protocols are heavily used in scalable apps.
Memory management (ARC)

Automatic Reference Counting (ARC) manages memory.
If misunderstood, it can cause:
- Memory leaks
- Crashes
Error handling
Swift uses structured error handling:
do {
try someFunction()
} catch {
print(error)
}
This makes apps more stable and predictable.
Xcode and iOS Development Environment
If you’re serious about iOS app development, there’s one tool you simply can’t avoid: Xcode. It’s Apple’s official development environment, and it’s where everything happens, from writing code to testing and publishing your app.
At first, Xcode can feel overwhelming. But once you understand how it’s structured, it becomes much easier to work with. Let’s break it down in a way that actually makes sense.
Xcode Interface Overview
When you open Xcode for the first time, it might look like a lot is going on. In reality, most of your work happens in just a few key areas.
Main Components of Xcode
| Component | What It Does |
| Editor | Where you write and edit your code |
| Interface Builder | Visual tool to design your app’s UI |
| Navigator Panel | Helps you move between files and project folders |
| Debug Console | Shows logs, errors, and debug output |
Each of these sections plays a specific role. For example, you’ll use the Editor to write Swift code, while Interface Builder (or SwiftUI previews) helps you design how your app looks.
Once you get comfortable navigating these areas, your workflow becomes much smoother.
Project Setup and Structure
A clean project structure is one of the most underrated parts of iOS application development. Without it, even small apps can quickly become hard to manage.
When you create a new project in Xcode, you’ll usually see a structure like this:
Typical Project Structure
| Component | Purpose |
| AppDelegate / SceneDelegate | Manages app lifecycle and system events |
| Views / ViewControllers | Handles UI screens and user interactions |
| Models | Represents your data and business logic |
| Services | Manages APIs, networking, and data handling |
Keeping your files organized from the start saves you from confusion later, especially as your app grows.
A well-structured project is easier to debug, scale, and collaborate on, which is why experienced iOS app developers pay close attention to this early on.
Simulator vs Real Device Testing
Testing is a big part of the iOS development process, and Xcode gives you two main ways to do it.
Simulator vs Real Device
| Option | Advantages | Limitations |
| Simulator | Fast, easy to use, no setup needed | Not 100% accurate |
| Real Device | True performance and behavior | Requires a physical device |
The simulator is great for quick checks, testing layouts, and trying different screen sizes.
But it doesn’t fully replicate real-world conditions like:
- Device performance
- Network behavior
- Hardware features (camera, GPS, etc.)
That’s why testing on a real iPhone is essential before launching your app. Skipping this step is one of the most common mistakes in iOS mobile app development.
Debugging Tools in Xcode
No matter how careful you are, bugs will happen. What matters is how quickly you can find and fix them.
Xcode provides several built-in tools that make debugging much easier.
Key Debugging Tools
| Tool | Purpose |
| Breakpoints | Pause code execution to inspect behavior |
| Console Logs | Track outputs and error messages |
| Memory Graph | Detect memory leaks and retain cycles |
| Performance Tools | Analyze speed, CPU usage, and responsiveness |
For example, if your app suddenly crashes, you can use breakpoints to stop execution and see exactly what went wrong. If the app feels slow, performance tools help identify the bottleneck.
Learning how to use these tools is a major step forward if you want to learn iOS development the right way.
iOS App Architecture Patterns
When people first start iOS app development, they focus mostly on writing code that works. But as apps grow, one thing starts to matter a lot more: architecture.
App architecture is how your code is organized. It decides whether your app stays clean and easy to manage, or turns into a mess that’s hard to fix and scale.
A good architecture won’t just help you today, it will save you time months down the line when your app becomes more complex.
MVC Explained (Model-View-Controller)
MVC is one of the oldest and most commonly used patterns in iOS application development. Apple originally designed UIKit around it, so you’ll see it in many projects.
It divides your app into three parts:
| Component | Role |
| Model | Handles data and business logic |
| View | Displays UI elements |
| Controller | Connects Model and View |
At first, MVC feels simple and easy to use. But as your app grows, a common issue appears:
“Massive View Controllers”
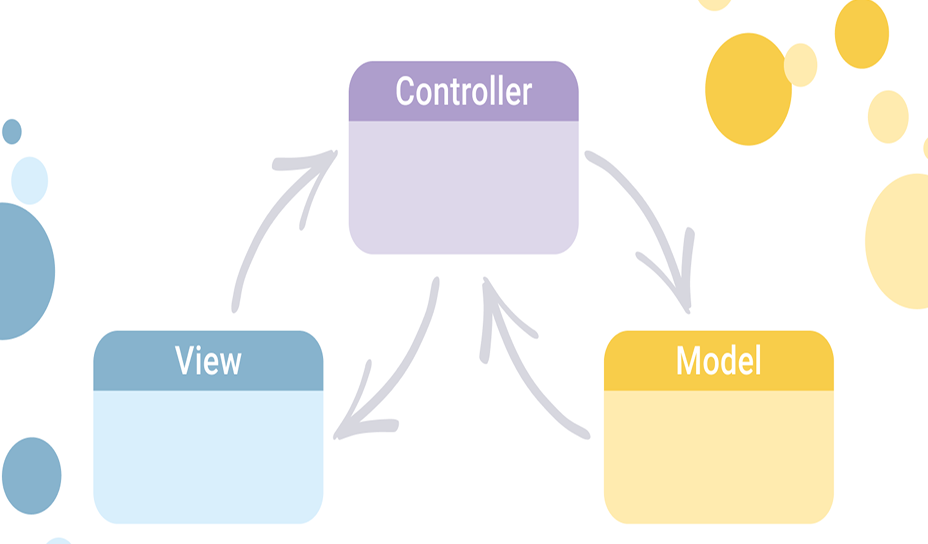
This happens when too much logic gets added to the controller. Instead of being a simple connector, it becomes overloaded with responsibilities, making the code harder to read, test, and maintain.
MVVM Explained (Model-View-ViewModel)
To solve the problems of MVC, many developers moved to MVVM.
In this pattern, a new layer called the ViewModel is introduced between the View and the Model.
MVVM Structure
| Component | Role |
| Model | Manages data |
| View | Displays UI |
| ViewModel | Handles logic and prepares data for UI |
The ViewModel takes care of most of the logic, which keeps your UI layer clean and simple.
Why MVVM Works Well
- Cleaner and more organized code
- Easier to test logic without UI dependencies
- Better scalability for larger apps
This is why many modern iOS app developers prefer MVVM, especially when working with SwiftUI.
Clean Architecture Basics
Clean Architecture takes things a step further. Instead of focusing only on structure, it focuses on long-term maintainability.
The idea is to separate your app into layers, where each layer has a specific responsibility.
Core Principles
| Principle | What It Means |
| Separation of Concerns | Each part of the app has a clear role |
| Testability | Code can be tested independently |
| Independence | Not tightly tied to frameworks like UIKit/SwiftUI |
In simple terms, your business logic should not depend on your UI. This makes it easier to update or replace parts of your app without breaking everything.
Clean Architecture is often used in large-scale apps where long-term stability matters.
Architecture Decision Framework
One common mistake in iOS mobile app development is trying to use the “best” architecture for every project. In reality, there’s no universal solution.
The right choice depends on your situation.
How to Choose the Right Architecture
| Factor | What to Consider |
| App Complexity | Simple apps → MVC, complex apps → MVVM/Clean |
| Team Size | Larger teams need a clearer structure |
| Timeline | Tight deadlines may favor simpler patterns |
For example:
- A small personal app might work fine with MVC
- A growing startup app may benefit from MVVM
- A large enterprise app might require Clean Architecture
UI/UX Design in iOS Apps
In iOS app development, design isn’t just about how your app looks, it’s about how it feels to use. A clean interface can make even a simple app enjoyable, while a confusing layout can push users away in seconds.
Good UI/UX design helps users navigate your app without having to think too much. That’s the goal: reduce friction and make everything feel natural.
SwiftUI vs UIKit
When building the interface in iOS mobile app development, you’ll mainly choose between two frameworks: SwiftUI and UIKit.
Quick Comparison
| Feature | SwiftUI | UIKit |
| Approach | Declarative (describe what UI should do) | Imperative (control how UI behaves) |
| Learning Curve | Easier for beginners | Steeper but more flexible |
| Speed | Faster to build UI | More manual setup required |
| Flexibility | Limited in some advanced cases | Full control over UI behavior |
| Use Case | New apps | Complex or legacy apps |
SwiftUI is now the preferred choice for most new projects. It lets you build interfaces faster with less code. On the other hand, UIKit is still useful when you need deep customization or are working on older apps.
If you’re just starting to learn iOS development, SwiftUI is usually the better place to begin.
Auto Layout System
Apps run on different iPhone and iPad screen sizes, so your UI needs to adjust automatically. That’s where Auto Layout comes in.
It allows you to define rules (constraints) for how elements should resize and reposition on different screens.
Why Auto Layout Matters
| Without Auto Layout | With Auto Layout |
| UI breaks on different screens | UI adapts smoothly |
| Elements overlap or misalign | Consistent layout across devices |
| Poor user experience | Professional, polished look |
Skipping proper layout handling is a common mistake in iOS application development, especially for beginners.
Responsive Design Principles
A good iOS app should feel natural on any device, whether it’s a small iPhone or a larger iPad.
To achieve that, follow these core principles:
- Flexible layouts: Avoid fixed sizes where possible
- Dynamic text: Support different font sizes
- Device adaptability: Adjust UI for different screen types
Responsive Design Checklist
| Principle | What It Means |
| Flexibility | Layout adjusts to screen size |
| Readability | Text remains clear and scalable |
| Consistency | Same experience across devices |
These small details make a big difference in how users experience your app.
Accessibility Best Practices
Accessibility is often overlooked, but it’s a key part of building high-quality apps. It ensures your app is usable by people with different abilities.
Key Accessibility Features
| Feature | Why It Matters |
| VoiceOver Support | Helps visually impaired users navigate |
| Color Contrast | Improves readability |
| Scalable Fonts | Supports users with vision needs |
Designing with accessibility in mind doesn’t just help a small group; it improves usability for everyone.
Data Handling and API Integration
In real iOS app development, almost every useful app depends on data in some form. Whether it’s saving a user’s preferences locally or pulling live content from the internet, how you manage data decides how smooth and reliable your app feels.
This stage is less about flashy features and more about structure, how information moves, changes, and stays consistent across your app.
Local Storage (Core Data, UserDefaults)
iOS gives you built-in tools for storing data directly on the device. Each serves a different purpose, and choosing the right one keeps your app lightweight and organized.
Storage Options Compared
| Tool | Best Use Case | Complexity |
| UserDefaults | Simple settings and flags | Low |
| Core Data | Structured, relational data | High |
UserDefaults works well for small things like theme settings, login status, or toggles. It’s quick but not designed for large or complex data.
Core Data is used when your app needs structured storage, like notes, tasks, or offline content that must be managed efficiently.
Using the right storage method early in iOS mobile app development prevents performance issues later.
REST APIs and JSON Parsing
Most modern apps don’t rely only on local data; they communicate with servers using APIs.
A REST API acts like a bridge between your app and a backend system.
Standard Data Flow
| Step | What Happens |
| Request | App asks for data |
| Response | Server sends JSON data |
| Parsing | Convert JSON into usable models |
| UI Update | Display updated information |
JSON is the most common format used for data exchange. Once received, it must be converted into Swift models before the app can use it.
If this process is not handled carefully, it can lead to delays, crashes, or incorrect UI updates.
State Management
State refers to the current condition of your app, what data it holds, and what the user sees at any moment.
For example:
- Is the content still loading?
- Is the user authenticated?
- Has data already been fetched?
When the state is not managed properly, apps start behaving unpredictably. You might see outdated data, flickering screens, or incorrect UI updates.
Good state handling keeps everything synchronized and predictable, especially in dynamic apps built with iOS application development frameworks like SwiftUI.
Debugging and Testing iOS Apps
Even well-written apps contain bugs. What matters is how quickly and systematically you can identify and fix them.
Common Issues in iOS Apps
Some problems appear frequently during development:
| Issue Type | What It Usually Means |
| Null values | Missing or unavailable data |
| UI glitches | Layout not rendering correctly |
| Memory leaks | Resources not being released |
| API failures | Network or server issues |
These issues are part of everyday iOS development basics, especially when working with real data and multiple devices.
Debugging Workflow
Instead of randomly changing code, experienced developers follow a structured process:
Practical Debugging Flow
- Recreate the problem consistently
- Identify the exact location in the code
- Isolate the root cause
- Apply a controlled fix
- Verify the solution under real conditions
This approach reduces guesswork and makes debugging faster and more reliable in iOS app development projects.
Unit Testing vs UI Testing
Testing ensures your app behaves correctly before it reaches users.
Clear Comparison
| Type | What It Validates |
| Unit Testing | Individual functions and logic |
| UI Testing | Screens and user interactions |
- Unit tests focus on backend logic and calculations
- UI tests simulate real user behavior on screens
Using both together improves stability and reduces unexpected crashes after release.
iOS App Testing Checklist
Before releasing an app, developers verify core functionality across multiple scenarios.
Final Pre-Launch Checks
- App opens without errors
- No unexpected crashes during usage
- Layout adapts to different screen sizes
- API responses load and display correctly
- Performance remains smooth under normal usage
iOS App Performance Optimization
Performance is what separates good apps from great ones.
Memory optimization techniques
- Avoid retain cycles
- Use weak references
- Release unused objects
Reducing app load time
- Lazy loading
- Optimize assets
- Reduce API calls
Efficient API calls
- Use caching
- Batch requests
- Handle errors properly
Performance monitoring tools
Use:
- Instruments
- Xcode profiler
These help identify bottlenecks.
iOS Development Checklist
In practical iOS app development, consistency matters more than complexity. A checklist keeps the entire workflow under control so nothing important is missed, from idea to App Store release. Instead of guessing what comes next, you follow a clear sequence that reduces mistakes and rework.
Pre-Development Checklist
This stage is about making sure you’re building the right product before you start writing code.
| Step | Focus Area |
| Idea validation | Confirm the real user need exists |
| Feature definition | Lock core functionality (MVP mindset) |
| Architecture | Decide the structure early to avoid refactoring |
The biggest risk here is overbuilding. A focused MVP approach keeps the project realistic and easier to manage in the early iOS development process.
Development Checklist
Once coding begins, structure becomes the priority. Clean habits here directly impact how scalable your app will be later.
| Practice | Why It Matters |
| Organized codebase | Prevents confusion as the app grows |
| Consistent naming | Makes collaboration easier |
| Git workflow | Tracks progress and allows safe rollback |
At this stage of iOS mobile app development, discipline in code structure is what separates maintainable projects from messy ones.
Testing Checklist
Testing ensures the app behaves correctly under real conditions, not just ideal ones.
| Testing Type | What It Focuses On |
| Unit testing | Verifies individual logic blocks |
| UI testing | Checks screen behavior and interactions |
| Edge scenarios | Handles unusual or unexpected inputs |
Edge cases are where most hidden bugs appear, like poor network conditions, empty responses, or invalid user input. Catching these early improves stability significantly.
Deployment Checklist
Before release, everything must align with Apple’s requirements and user expectations.
| Step | What to Confirm |
| App review rules | Compliance with Apple guidelines |
| Store assets | Screenshots, description, and keywords |
| Final validation | End-to-end testing on real devices |
Even a well-built app can get delayed if metadata or compliance details are incomplete, so this stage requires careful attention.
Common iOS Development Mistakes and Fixes
In iOS app development, most failures don’t happen because the idea is bad or the language is hard. They happen because small decisions get ignored early, and those decisions quietly grow into bigger problems later. The tricky part is that everything usually “works” at first, until the app starts scaling.
Here are the most common issues developers run into, along with practical ways to handle them before they turn into real trouble.
Weak or Rigid Architecture Choices
A lot of projects start with code written quickly just to get things moving. That’s fine for a prototype, but it becomes a problem when new features are added.
When structure isn’t planned properly, you end up with tightly connected code where one change breaks multiple parts of the app.
Better Approach
| Situation | What Works Better |
| Fast early development | Still define the structure upfront |
| Growing feature set | Separate responsibilities clearly |
| Hard-to-maintain code | Refactor into a layered design |
Even a simple app benefits from clear boundaries between UI, logic, and data. It’s less about picking a “perfect” pattern and more about avoiding chaos later in the iOS development process.
Ignoring Design Standards
Many apps don’t fail because they look bad; they fail because they feel confusing. Users don’t study your interface; they react to it instantly.
When design doesn’t follow familiar patterns, people get lost or frustrated.
What Helps
| Problem | Practical Fix |
| Inconsistent layout | Stick to Apple’s UI guidelines |
| Confusing navigation | Keep flows predictable |
| Overloaded screens | Reduce visual clutter |
Using Apple’s design system isn’t about limiting creativity; it’s about meeting user expectations. In iOS mobile app development, familiarity is part of usability.
Treating Testing as Optional
A common mistake is assuming testing is something you “add later.” In reality, it should run alongside development.
Without testing, small issues slip through and only show up after release, when they are harder and more expensive to fix.
Smarter Testing Approach
| Type of Check | What It Prevents |
| Logic testing | Broken calculations or workflows |
| UI testing | Screen misbehavior |
| Edge testing | Failures in unusual conditions |
Automating even part of this process helps catch problems early and keeps the app stable as it grows.
Ignoring Performance Until It Breaks
Performance issues rarely show up in small builds, they appear when data increases, screens multiply, or API calls stack up.
By the time users notice lag or freezing, the root cause is usually buried deep in the code.
What Actually Helps
| Performance Area | Better Habit |
| UI responsiveness | Avoid unnecessary heavy tasks on the main thread |
| Data handling | Reduce repeated or wasteful API calls |
| App behavior | Regular profiling during development |
Instead of fixing performance at the end, it should be monitored continuously during iOS application development.
Real-World iOS Development Workflow
Building an app in a real company is very different from building a solo project. In professional iOS app development, success depends less on individual effort and more on how well the entire team works together.
A good idea can still fail if communication is weak, deadlines are unclear, or the workflow is disorganized. That’s why real-world teams follow structured processes.
How Professional Teams Build Apps
In a typical production environment, an app is not built by one person. It’s a shared effort between different roles, each focusing on a specific part of the product.
Core Team Roles
| Role | Main Responsibility |
| Developers | Write code and build features |
| Designers | Create UI and user experience |
| QA Testers | Find bugs and verify functionality |
| Product Managers | Define features and guide direction |
Each role depends on the others. For example, developers rely on designers for layouts, while testers ensure everything works as expected.
In iOS mobile app development, this collaboration is what turns an idea into a polished product instead of just working code.
Agile Workflow in iOS Projects
Most modern teams don’t build everything at once. Instead, they use an Agile approach, where work is split into smaller cycles called sprints.
Each sprint focuses on delivering a small, usable part of the app.
Sprint Cycle
| Phase | What Happens |
| Plan | Decide what to build |
| Build | Developers implement features |
| Test | QA checks functionality |
| Review | Team evaluates progress |
This cycle repeats until the app is complete.
The advantage of Agile in iOS application development is flexibility. If something doesn’t work well, it can be adjusted in the next sprint instead of waiting until the end of the project.
CI/CD Basics for iOS
As apps grow, manual testing and manual releases become slow and error-prone. That’s where CI/CD comes in.
CI/CD stands for:
- Continuous Integration (CI)
- Continuous Deployment (CD)
Continuous Integration (CI)
This process automatically checks your code whenever changes are made.
| CI Function | Why It Matters |
| Run automated tests | Catch bugs early |
| Validate code | Ensure stability before merging |
| Detect issues fast | Reduce debugging time |
In real projects, every code change is verified before it becomes part of the main app. This keeps the project stable even when many developers are working at once.
Continuous Deployment (CD)
Once code is tested and approved, it can be automatically prepared for release.
| CD Benefit | What It Improves |
| Faster releases | Reduces manual steps |
| Fewer human errors | Automates the deployment process |
| Consistent updates | Keeps the app up to date regularly |
In modern iOS development process pipelines, CI/CD ensures that updates move smoothly from development to production without delays or last-minute surprises.
Final Thoughts
Getting comfortable with iOS app development is less about memorizing every function in Swift and more about understanding how all the moving parts connect. Code is just one layer. What really matters is how you structure an app, how data flows through it, and how users actually experience what you build.
From architecture decisions to UI design, from debugging unexpected crashes to improving performance under real usage, each part plays a role. None of them works in isolation. A solid app is usually the result of many small, thoughtful decisions that add up over time.
If you’re just starting, trying to master everything at once will only slow you down. Progress in iOS mobile app development tends to come in cycles: you build something, it breaks in ways you didn’t expect, you fix it, and you understand a bit more than before.
That loop is where real learning happens.
Instead of aiming for perfection, focus on building consistently. Start small, experiment often, and don’t be afraid of mistakes; they’re part of the process, not a setback. The more real apps you build, the clearer the iOS development process becomes.
In the end, becoming a strong iOS developer isn’t about knowing everything; it’s about being comfortable figuring things out as you go.
Book a consultation with our expert iOS app developer to streamline your workflows and enhance internal process control today.
FAQs
Answering the most common questions related to iOS app development.
-
What is iOS app development?
It refers to building applications for Apple devices like iPhones and iPads using tools such as Xcode and programming languages like Swift. It includes everything from writing code to testing, debugging, and publishing apps on the App Store.
-
How to become an iOS app developer?
Start with learning Swift and understanding Xcode. Begin with small practice apps, then gradually move toward more advanced projects that include APIs, data storage, and real-world features. Consistent hands-on practice matters more than theory alone.
-
What is the iOS app development process?
It follows a structured flow that includes planning, design, development, testing, deployment, and maintenance. Each stage builds on the previous one to turn an idea into a fully working application.
-
Why is Swift used in iOS development?
Swift is modern, fast, and safer compared to older languages. It reduces common coding errors, improves readability, and speeds up development, making it the preferred choice for most iOS app development projects.
-
How does iOS app architecture work?
It organizes an app into separate layers such as data, UI, and logic. This separation makes the code easier to manage, scale, and debug, especially as the app becomes more complex.
-
How to debug iOS apps in Xcode?
Xcode provides tools like breakpoints, logs, and performance inspectors. These help pause execution, track values, and identify where issues occur in the code.
-
When should you use SwiftUI vs UIKit?
SwiftUI is best for new projects because it is modern and faster to build with. UIKit is still useful when working on older apps or when advanced UI control is needed.
-
What happens if an iOS app is not optimized?
Unoptimized apps may become slow, drain battery faster, crash unexpectedly, or perform poorly under heavy usage. In some cases, they may also face rejection during App Store review.
-
How to test an iOS application properly?
A proper testing approach includes unit testing for logic, UI testing for user interactions, and real-device testing for accurate behavior. Combining all three improves reliability.
-
Why do iOS apps crash and how to fix them?
Common causes include memory issues, null values, and failed API responses. Fixing them involves debugging in Xcode, improving error handling, and optimizing how data is processed and stored.


